LoRA Combination Recipes: Mixing Styles Like a Mad Scientist
Introduction
Here’s a confession: I got completely obsessed with LoRA stacking. What started as “let me just try adding one more LoRA” turned into hours of tweaking weights, swapping combinations, and watching my characters transform in ways I never expected.
The thing about LoRAs is that individually, they’re nice. A style LoRA here, a clothing LoRA there. But when you start combining them? That’s when things get genuinely interesting — and occasionally chaotic. I spent an embarrassing amount of time figuring out which combinations actually work and which ones produce nightmare fuel, so let me save you the trouble.
This guide shares the recipes I landed on after all that experimentation — specifically, how to mix cute and fashionable styles using the Illustrious-based Amanesse Works checkpoint. But the principles apply to any LoRA stacking workflow.
What Actually Happens When You Stack LoRAs
Before we dive into recipes, let’s talk about what’s going on under the hood. A LoRA (Low-Rank Adaptation) modifies specific layers of your checkpoint’s neural network. When you load multiple LoRAs, each one adjusts different (or sometimes overlapping) parts of the model.
Think of it like layering Instagram filters — except each filter is changing the AI’s understanding of what “good art” looks like. Stack two complementary LoRAs and you get something better than either alone. Stack two conflicting ones and you get… well, let’s just say I’ve seen some things. If you want an alternative approach to style mixing that doesn’t require pre-trained LoRAs at all, IPAdapter lets you blend styles using reference images directly.
The key concept: LoRA weights. Each LoRA has a weight value (typically 0.0 to 1.0, but you can go higher). This controls how strongly that LoRA influences the output:
- 0.0 — The LoRA is loaded but doing nothing
- 0.3–0.5 — Subtle influence, good for accent styles
- 0.6–0.8 — Strong influence, the sweet spot for most combinations
- 1.0 — Full strength, the LoRA’s effect dominates
- Above 1.0 — Possible but risky — artifacts and distortions start creeping in
When combining LoRAs, the total “weight budget” matters. If you crank everything to 1.0, the model gets pulled in too many directions at once. The sweet spot for most two-LoRA combos is keeping each between 0.3 and 0.8.
The Checkpoint Foundation: Why It Matters
I originally tried building these combinations on the Anikawa checkpoint. Couldn’t make it work no matter what I did. Then I switched to Amanesse Works (an Illustrious-based checkpoint) and suddenly everything clicked.
This isn’t a knock on Anikawa — it’s a reminder that your checkpoint is the foundation, and not every foundation supports the same structure. Some checkpoints respond beautifully to certain LoRAs and completely ignore others. If a combination isn’t working, before you spend three hours adjusting weights, try a different checkpoint.
For the recipes below, I used Amanesse Works specifically because it plays well with both cute-style and fashion-style LoRAs without fighting either one. If you’re using a different Illustrious-based checkpoint, you should get similar results, but expect to adjust weights slightly.
Recipe 1: The Cute Style Stack
This was my first successful combination — building a soft, cute anime aesthetic that works for character illustrations and manga panels.
The approach:
- Start with Amanesse Works as your base checkpoint
- Layer a cute-style LoRA (soft features, round eyes, gentle expressions) at around 0.6–0.7 weight
- Add character-specific details through prompting rather than a third LoRA
What I learned the hard way: The default face output looked kind of scary. Not “horror movie” scary, but “something’s off and I can’t look away” scary. The fix was adding specific facial feature adjustments to the prompt — softening the eyes, adjusting proportions. Small tweaks made a huge difference.
The wildcard trick: Instead of manually writing different character variations, I set up selective syntax (wildcards) in my prompts. This lets you define a pool of options — hair colors, eye colors, clothing styles — and have ComfyUI randomly select from them. It’s like a character randomizer that stays within your style guidelines.
{red hair|blonde hair|silver hair|black hair},
{blue eyes|green eyes|amber eyes|violet eyes},
{school uniform|sundress|hoodie|casual outfit}
This single workflow can produce dozens of unique characters that all share the same cute aesthetic foundation. For a more systematic approach to character creation with Illustrious models, see our 3-step character creation guide.
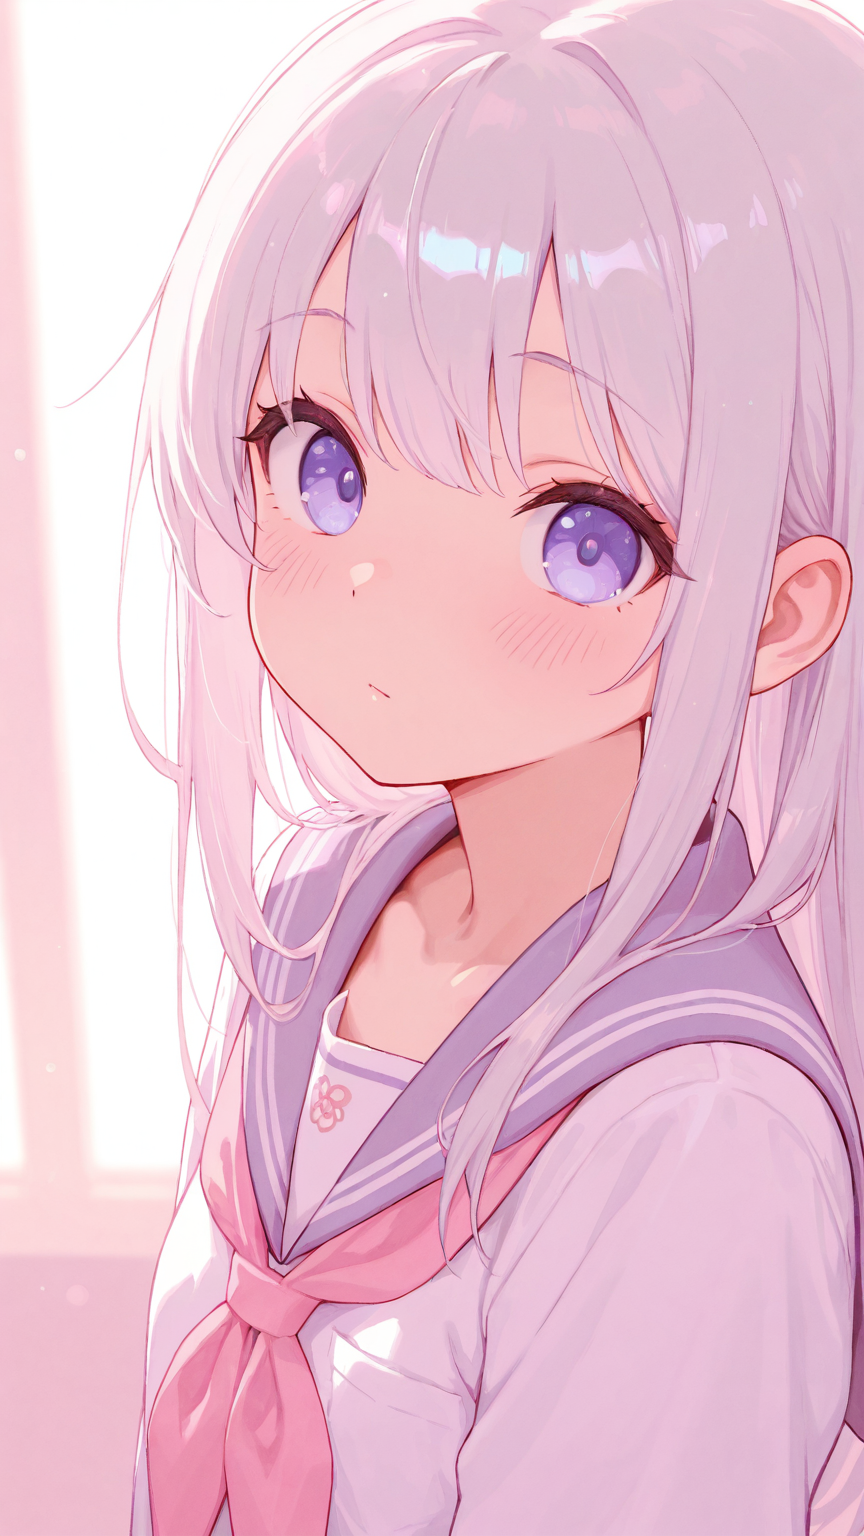
Results: Soft, appealing character illustrations with consistent quality. The kind of look that works for slice-of-life manga or character profile images. Once I nailed the recipe, the consistency was remarkable — every generation felt like it belonged in the same series.
Recipe 2: The Fashionable Style Stack
I wanted to make characters that looked like they belonged in a fashion editorial — stylish outfits, confident poses, that “editorial photography” vibe but in anime form.
The approach:
- Same Amanesse Works checkpoint foundation
- Layer a fashionable/stylish LoRA at 0.5–0.7 weight
- Pair with clothing-specific prompts that emphasize fabric texture, lighting, and composition
The key difference from cute: Fashion-style LoRAs push the model toward sharper features, more dynamic poses, and more detailed clothing rendering. The weight needs to be slightly lower than the cute stack because fashion LoRAs tend to be more aggressive — at 0.8+, they can overwhelm the checkpoint’s base style.
Prompt engineering matters more here. With cute styles, the LoRA does most of the heavy lifting. With fashion styles, you need to guide the output more explicitly. Prompts like “designer outfit,” “fashion photography lighting,” “editorial pose” make the difference between “character wearing nice clothes” and “actual fashion illustration.”
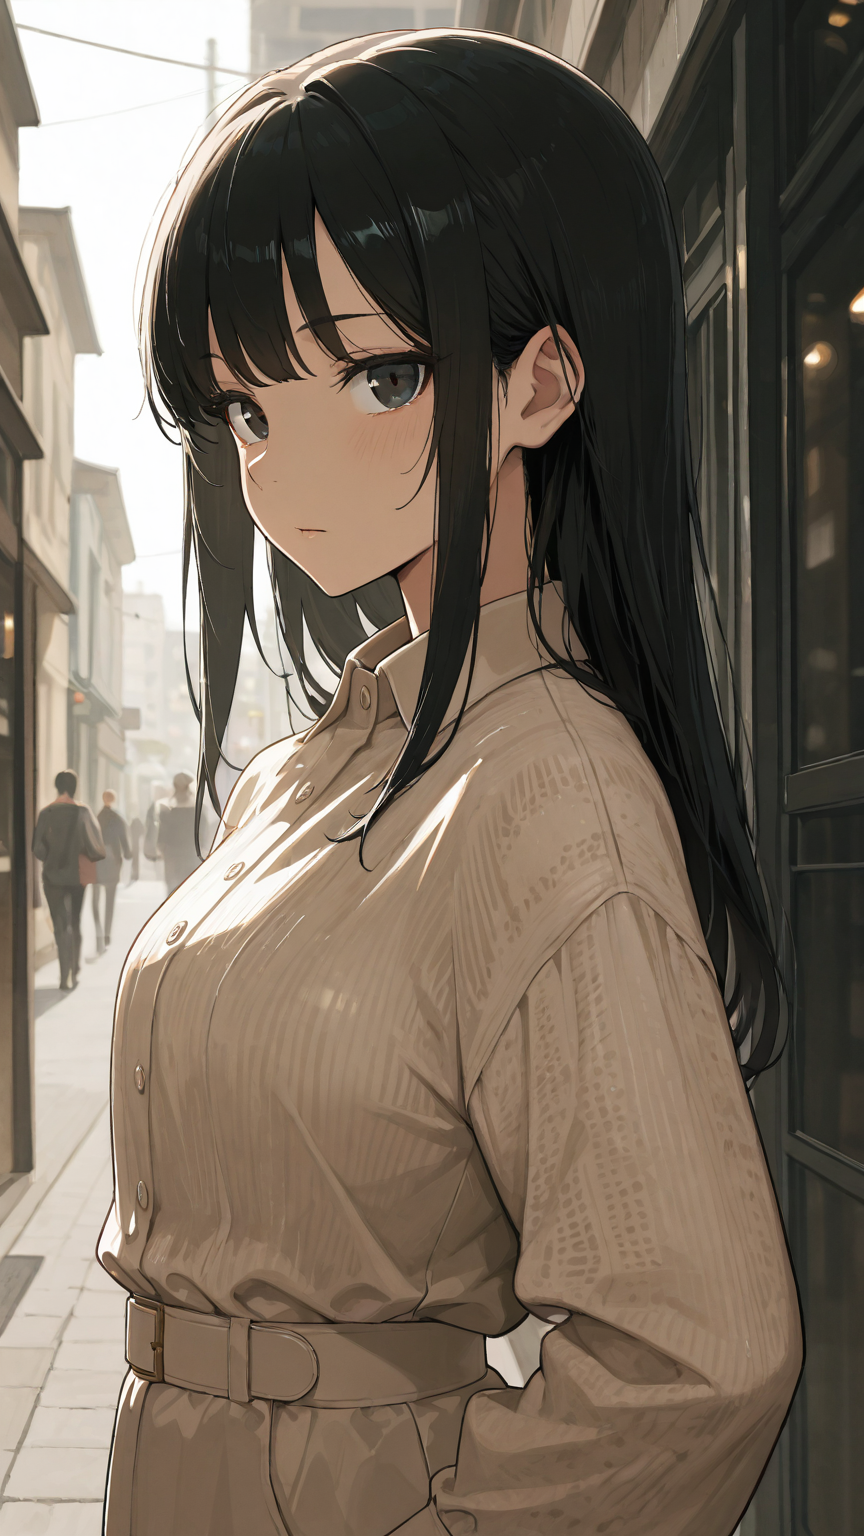
Results: Characters that look like they stepped out of a style magazine. The combination of Amanesse Works’ clean rendering with a fashion LoRA produces surprisingly polished output — detailed clothing, natural-looking fabric folds, and compositions that feel intentional rather than randomly generated.
Recipe 3: Mixing Cute + Fashionable
What if we just… combined both? What if we cranked both LoRAs to 1.0?
Spoiler: chaos. Beautiful chaos.
But seriously — mixing cute and fashionable LoRAs is where things get really fun, and also where weight balancing becomes critical.
The balanced approach:
- Amanesse Works checkpoint
- Cute LoRA at 0.4 weight (accent, not dominant)
- Fashionable LoRA at 0.5 weight (slightly stronger for the editorial feel)
- Let the prompts handle the specific character details
Why these weights? When both LoRAs fight for dominance, you get weird artifacts — faces that can’t decide if they want to be round and soft or sharp and angular. Keeping both below 0.6 and letting the checkpoint’s base style mediate between them produces the cleanest results.
The effect: You get characters that are cute but not childish, stylish but not severe. It’s a surprisingly natural middle ground — the kind of look that many AI companion platforms aim for because it has broad appeal.
Experimentation is the point. I spent way too long on these combinations, but that’s actually part of the fun. Shift the cute weight up to 0.6 and the fashionable down to 0.3 and you get a distinctly different feel. Reverse them and you get another. Each combination has its own personality.
Weight Balancing: The Rules I Wish Someone Had Told Me
After burning through hundreds of generations, here are the weight-balancing rules I’ve landed on:
Rule 1: The total weight of all style LoRAs should stay under 1.5. Two LoRAs at 0.7 each (total 1.4) usually works. Two at 0.9 each (total 1.8) usually doesn’t.
Rule 2: Let one LoRA lead. Even in a “balanced” mix, one LoRA should be slightly stronger than the other. This gives the model a clear direction and prevents the “can’t decide” artifacts.
Rule 3: Character LoRAs and style LoRAs stack differently. A character LoRA (specific face/body) at 0.8 + a style LoRA at 0.6 is usually fine because they’re modifying different parts of the network. Two style LoRAs at 0.8 each will fight because they’re both trying to change the same layers.
Rule 4: Test at 0.5 first, then adjust. Don’t start at full strength and work down — start in the middle and work outward. You’ll find the sweet spot faster and waste fewer generations.
Rule 5: Keep a notebook. I’m serious. Track which combinations you tried, at what weights, with what checkpoint. Your future self will thank you. nobin actually uses a Notion database to track which LoRAs work with which checkpoints — a simple compatibility matrix of yes/no/maybe for each combination.
Common Pitfalls (and How to Avoid Them)
Style bleeding: When one LoRA’s style leaks into areas it shouldn’t affect. A clothing LoRA might start changing face proportions, or a background style LoRA might alter skin tone. Fix: lower the weight of the bleeding LoRA and add more specific prompts for the affected areas.
The uncanny face: Stacking multiple LoRAs that each modify facial features can produce faces that look “almost human but something’s wrong.” Fix: use FaceDetailer as a post-processing step (see our img2img guide), or add explicit facial feature prompts.
Color drift: Multiple LoRAs can shift the color palette in unexpected directions — everything takes on a sepia tone, or colors become oversaturated. Fix: adjust individual LoRA weights or add color-specific prompts (“vibrant colors,” “natural skin tone”).
Checkpoint incompatibility: Not all LoRAs work with all checkpoints. An SDXL LoRA won’t work with an SD 1.5 checkpoint, and even within the same architecture, some combinations just don’t click. Fix: check the LoRA’s documentation on Civitai for recommended checkpoints, and always test before committing to a full generation batch.
LoRA order can matter: In some ComfyUI workflows, the order you chain LoRA Loader nodes affects the output. The first LoRA in the chain sometimes has a slightly stronger influence. If results look off, try swapping the order.
How This Powers AI Companion Customization
This is where LoRA stacking goes from “fun hobby technique” to “the technology behind your favorite platform.”
Style customization on companion platforms: When platforms like Candy.AI or YUKIKO.AI let you choose between anime, realistic, or semi-realistic art styles for your companion, they’re essentially swapping LoRA configurations behind the scenes. The cute/fashionable/realistic spectrum that nobin explored is exactly what these platforms offer as user-facing style options.
Character consistency with variety: The wildcard technique — defining a pool of variations within a consistent style — is how platforms generate multiple poses, expressions, and outfits for the same character without each image looking like a completely different person. The LoRA stack defines the style DNA; the prompts handle the variation.
User-facing “style sliders”: Some platforms offer sliders for things like “cute vs. mature” or “anime vs. realistic.” Under the hood, these are often adjusting LoRA weights in real time — exactly the kind of weight balancing we covered above. Moving the slider toward “cute” increases the cute LoRA weight and decreases the realistic one.
Why checkpoint selection matters for platforms: Just as nobin discovered that Amanesse Works produced better results than Anikawa for his specific combination goals, platforms invest significant time testing which checkpoint + LoRA combinations produce the most consistent, appealing results for their user base.
For a deeper understanding of how LoRAs fit into the broader model ecosystem, check out our guide to ComfyUI model types.
Getting Started: Your First LoRA Stack
Ready to try this yourself? Here’s a minimal workflow to get started:
-
Pick your checkpoint. Amanesse Works is great for the cute/fashionable range. For more realistic styles, try a realistic-oriented Illustrious checkpoint.
-
Find two complementary LoRAs on Civitai. Look for ones tagged with the same base architecture as your checkpoint. Read the descriptions — creators usually mention which other LoRAs stack well with theirs.
-
Set up in ComfyUI: Chain two LoRA Loader nodes after your checkpoint loader. First LoRA at 0.5 weight, second at 0.5 weight.
-
Generate a few test images. Look at the output critically — is the style what you want? Are there artifacts?
-
Adjust weights. Bump one up to 0.6, lower the other to 0.4. Generate again. Compare. Repeat until you find your sweet spot.
-
Save your recipe. Once you find a combination you like, save the exact weights, checkpoint, and prompt template. You’ll want to come back to it.
The beauty of LoRA stacking is that there’s no single “right” answer — it’s genuinely creative work, and the combinations that resonate with you will be different from anyone else’s. That’s kind of the whole point.
Credits & Source
This guide is adapted from nobin’s original Japanese articles on note.com/nobinlog. We’ve translated and recreated his workflows to share these techniques with an English-speaking audience. nobin’s approach to LoRA combinations — treating it like recipe development, systematically testing combinations, and building gallery sites to showcase the results — is exactly the kind of methodical experimentation that produces genuinely useful knowledge.
Check out his original posts for the full visual examples and recipe details:
- Cute系LoRA組み合わせレシピ — The cute-style LoRA combination recipes
- Fashionable系LoRA組み合わせレシピ — The fashionable-style LoRA combination recipes
- Cute系とFashionable系の組み合わせ — Combining both cute and fashionable styles